SAVING
DISK SPACE ON
WINDOWS 7-10-11 INSTALLS
This tip may be useful for someone who's a bit short on HD / SSD space for a Windows 7-8-10-11 install.
I'm not including Windows 6 as Vista has a couple of quirks (and for Windows XP you can do "drag'n'drop"
installs but I'm not going to get into that here - if you want to see an example of Windows XP "drag'n'drop"
installs with 8 XP installs on 1x2GB disk, see here).
The methods here work for MBR installs and I'm guessing they should also work for GPT installs, although
I've not tried it (I've never used GPT as I don't see any benefit to it).
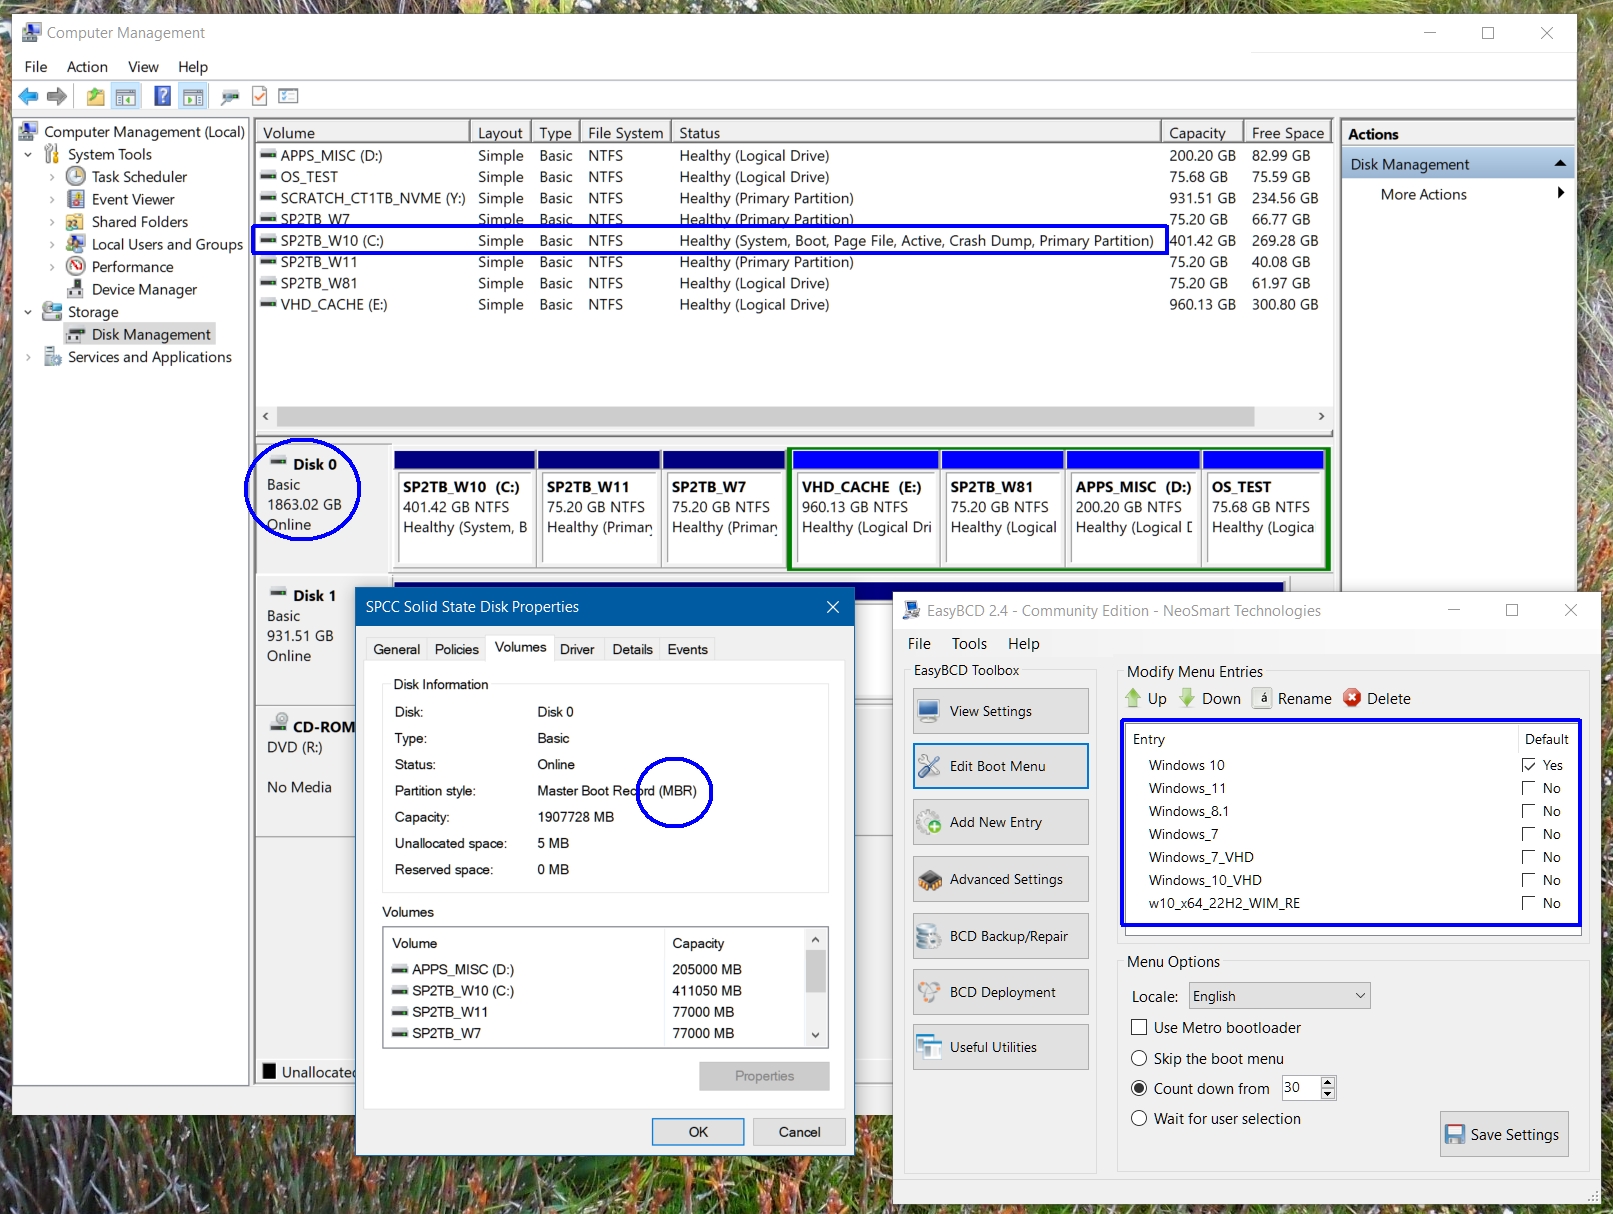
You can install Windows 7-8-10-11 in such a way that separate System / MS Reserved / Recovery partitions
won't be created, which can save around 5GB - 10GB of HD space.
These partitions are not needed for booting, as you can see in the image below.
If you ever need to recover Windows using the built in recovery then you can always boot from your
ISO/USB drive and select the Repair option.
There are 2 ways to do this - not using DISM or using DISM.
Not using DISM
The older method for people who prefer a GUI based approach with Windows Disk Mangement.
The method is to first partition the HD you'll use for the install with 2 partitions, then format each partition
and drop a few large files into each partition and set partition 1 to Active.
(How you attach the disk for formatting is up to you).
When done, go ahead with the Windows install and select partition 1 for the Windows install.
The Windows installer will then skip creating separate System / MS Reserved / Recovery partitions and just
put all the necessary boot files into the OS partition 1, being the C:\ drive.
Having done the install, you can delete partition 2 and resize partition 1 to use the whole disk (if needed).
It seems there's something in the installer that baulks at creating/wiping/resizing existing data partitions.
Whatever the reason, it works for me.
Note that if using this method you'll still be subject to the installer's minimum HD space requirements - to
work around that use the DISM method.
Using DISM
A simpler way to format the HD / SSD, install Windows and make the new install bootable using DISM.
You'll need a bootable USB drive with a Windows install ready to go.
I'm not going to go into all the detail of the Diskpart and DISM commands here (there are only a few of
each) as there are already about 482,743 videos on YouTube covering this method.
Check the BrenTech or Memory or CyberCPU or Britec09 or [. insert name here .] YouTube channels.
Basically you boot into Windows setup from the USB and then use Shift+F10 to get a command prompt,
then use Diskpart to create 1 partition on the HD, then format the partition and then set it to Active.
(Note - a benefit to DISM is that you bypass the installer's minimum space requirements check. I've not tested
how low you can go with HD size as I normally use 60GB SSDs for Windows 10-11, a bit on the generous side
(the minimum HD size for Win 11 IOT LTSC is 16GB). It'd be interesting to know how low you can go).
Next, use DISM to apply the appropriate Windows image from the USB Sources\install.wim file to the HD
partition and then use another DISM command to create the boot structure for the new install (if you have
another working Windows install on the HD then skip the "create boot structure" step and reboot into the
existing install to update the boot menu - then reboot and select the boot menu item for the new install).
Once done you can remove the USB drive and re-boot into the usual Windows "Out of box" config.
The advantages of using DISM are that it's fast and lets you apply a Windows image to any partition, either
primary or logical.
If you already have a Windows 7-8-10-11 install on partition 1 then you can use DISM to apply another
Windows image to any partition (either primary or logical) and boot from any partition (either primary or
logical) without having to go through the step of making each DISM install separately bootable - as the
boot files needed to boot any subsequent installs are already in the Windows install on partition 1.
All you have to do to get the new DISM install to boot is add an entry to the boot menu of the existing
install on partition 1 using BCDedit (for the brave) or a program such as EasyBCD (for the rest of us).
A consequence of Windows having a 2 stage boot loader - stage 1 on C, stage 2 on the new install (well . .
strictly speaking it's a 3 stage boot loader, or 4 stage boot loader if you want to be monumentally pedantic).
After the install you could create a Recovery partition if you wanted using Reagentc.exe to configure it and
drop the recovery WIM in it but I never bother as it's easier just to use the Windows install media or restore
a previously saved OS image.
Either method is worth thinking about if you're using a smaller HD / SSD for an install as you can save space.
Give it a try in VirtualBox or VMware and see what you think.
Kind regards,
Shotter_Nail
Windows 10 & 11 Installs Without System/Reserved/Recovery Partitions
Win 7, 8.1, 10, 11 on 1x2TB MBR SSD using DISM method - 8.1 runs from logical drive using bcd store on C:
Note the lack of separate System / MS Reserved / Recovery partitions (open in new tab for larger view).
< Go Back